
Removing Kitchen Aid attachments safely is simple once you know the right steps. This guide covers how to detach every mixer accessory — from the dough hook to the slicing disc — without causing damage. You will learn the release lever method, proper cleaning tips, and common mistakes to avoid. Keep your stand mixer accessories in perfect shape with our expert advice.
Your KitchenAid stand mixer is one of the most versatile tools in any kitchen. It comes with a wide range of attachments that make cooking and baking easier and more fun. But at some point, you need to swap one attachment for another. And that is when things can get tricky.
Learning how to remove Kitchen Aid attachments without damage is an essential skill for every home cook. Many people struggle with stuck attachments, scratched hubs, or broken release mechanisms. The good news is that removing attachments the right way is actually very simple. You just need to know the correct steps and avoid a few common pitfalls.
In this guide, we will walk you through every method, every attachment type, and every tip you need. Whether you use a tilt-head mixer or a bowl-lift model, this article has you covered. We will also share expert maintenance tips so your KitchenAid stand mixer stays in top shape for years to come.
Key Takeaways
- Always power off and unplug your mixer before removing any attachment to stay safe.
- Use the release lever or tilt-head method to detach attachments gently and correctly.
- Never force an attachment off — this can damage the hub, shaft, or the attachment itself.
- Clean attachments after every use to prevent buildup and extend their lifespan.
- Store attachments properly in a dry place to avoid rust and corrosion.
- Check the attachment hub regularly for wear, debris, or damage that affects performance.
- Follow manufacturer guidelines for each specific KitchenAid stand mixer model and accessory.
📑 Table of Contents
- Why Proper Attachment Removal Matters
- Understanding Your KitchenAid Mixer Attachments
- Step-by-Step Guide to Removing Standard Attachments
- Removing Specialty and Optional Attachments
- Quick Tips for Safe and Easy Removal
- Common Mistakes to Avoid When Removing Attachments
- Cleaning and Maintaining Your Attachments
- When to Seek Professional Help
- Conclusion
Why Proper Attachment Removal Matters
You might wonder why it matters so much how you pull off a mixer attachment. The truth is, rough handling causes real damage over time. Your mixer attachments are precision-engineered parts that fit together with tight tolerances. Forcing them apart can lead to scratches, misalignment, and even motor strain.
When you remove attachments correctly, you also protect the attachment hub. This is the central connection point on your mixer where every accessory locks into place. A damaged hub means your mixer won’t hold attachments securely. That is a costly repair you can easily avoid.
Proper removal also keeps your attachments working at their best. A dough hook that gets bent from forced removal will not knead dough properly anymore. A whisk attachment with a bent shaft will not whip cream evenly. Taking a few extra seconds to remove each piece correctly pays off in the long run.
Common Damage Caused by Improper Removal
- Scratched or chipped attachment hubs — caused by using tools or excessive force
- Bent or warped attachment shafts — from pulling sideways instead of straight out
- Stripped release mechanisms — from yanking attachments without using the lever
- Cracked bowl or mixer housing — from impact during rough removal
- Damaged power hub gears — from removing attachments while the mixer is still running
Understanding Your KitchenAid Mixer Attachments
Before you learn how to remove them, it helps to understand what you are working with. KitchenAid mixers come with several standard attachments. Each one attaches and removes in a slightly different way. Let us break them down so you feel confident every time.
Standard Attachments and How They Connect
Most KitchenAid stand mixers share a common attachment system. The flat beater is the workhorse attachment for everyday mixing. The dough hook handles heavy bread dough with ease. The whisk attachment whips cream, meringues, and batters to perfection.
All three of these standard attachments connect to the mixer’s power hub at the bottom of the bowl. They lock into place with a simple quarter-turn motion. To remove them, you reverse the process. But the method depends on your mixer model.
Beyond the standard three, KitchenAid offers many optional accessories. These include the pasta roller attachment, the food grinder attachment, the slicing disc, and the shredding disc. Each of these connects through different hubs and requires specific removal techniques.
Attachment Compatibility by Mixer Model
Not all attachments fit all mixers. Older models from the 1960s and 1970s use a different hub system than modern mixers. Here is a quick comparison to help you identify your setup.
| Mixer Type | Hub System | Attachment Removal Method |
|---|---|---|
| Tilt-Head (Modern) | Power Hub with Release Lever | Pull release lever, twist and pull attachment |
| Bowl-Lift (Modern) | Power Hub with Release Lever | Pull release lever, twist and pull attachment |
| Classic Tilt-Head | Snap-On Hub | Pull attachment straight up with gentle force |
| Artisan Series | Power Hub with Release Lever | Pull release lever, twist and pull attachment |
| Legacy Models (Pre-2000) | Friction Fit Hub | Pull firmly but straight, no lever involved |
Knowing your mixer type helps you choose the right removal method. If you are unsure, check your model number on the bottom of the mixer or in the user manual.
Step-by-Step Guide to Removing Standard Attachments
Now let us get into the practical steps. This section covers the most common mixer attachment removal process for modern KitchenAid tilt-head and bowl-lift models.
Step 1: Safety First
Before you touch any attachment, make sure your mixer is completely off. Unplug it from the wall. This is the single most important safety step. You do not want the mixer to accidentally turn on while your hand is near the hub.
Also, make sure the mixer speed is set to zero. If your model has a speed control, confirm it is at the lowest setting before you begin.
Step 2: Wait for the Mixer to Stop Completely
If you just finished using the mixer, wait a moment for the attachment to come to a full stop. Removing a spinning attachment is dangerous and can cause injury. Patience here keeps you safe.
Step 3: Locate the Release Lever
On modern KitchenAid mixers, you will find a small release lever on the underside of the mixer head. This lever unlocks the attachment from the power hub. On tilt-head models, it is usually on the back or side near the hub. On bowl-lift models, the lever is in a similar position.
Some older models do not have a release lever. In that case, you simply pull the attachment straight up with a gentle but firm grip. We will cover both methods below.
Step 4: Engage the Release Lever
With the mixer unplugged, pull the release lever toward you or upward, depending on your model. You should feel it click or disengage. This unlocks the attachment from the hub.
Do not try to pull the attachment off yet. Just release the lever first. This is a step many people skip, and it leads to unnecessary force and potential damage.
Step 5: Remove the Attachment
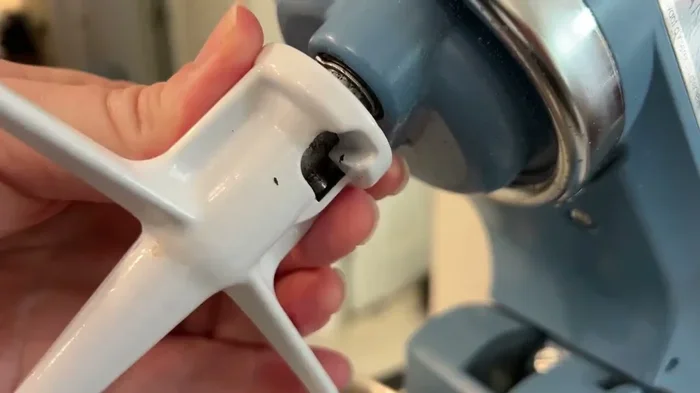
Now you can remove the attachment. Grip it firmly by the body — not the shaft or the beaters. Twist it slightly counterclockwise while pulling it straight up. The attachment should come off smoothly with minimal effort.
If it feels stuck, stop. Do not use a tool or excessive force. Check for food debris around the hub that might be causing the lock-up. A quick clean often solves the problem.
Step 6: Inspect and Clean
Once the attachment is off, inspect both the attachment and the hub for any food residue, buildup, or damage. Clean the attachment with warm soapy water. Dry it thoroughly before storing. We will cover cleaning in more detail in the next section.
Removing Specialty and Optional Attachments
Standard attachments follow the basic removal process above. But specialty attachments like the pasta roller, food grinder, slicing disc, and shredding disc need a different approach. Let us walk through each one.
Pasta Roller and Cutter Attachments
The KitchenAid pasta roller attachment connects to the side of the mixer using the same power hub. To remove it, follow the same release lever process. Pull the lever, twist slightly, and pull the attachment away from the mixer body.
The pasta cutter attachment connects to the pasta roller. To remove the cutter, slide it off the roller by pulling it gently toward you. Do not bend the sharp edges. Store the cutter in its protective sleeve if it came with one.
Food Grinder Attachment
The food grinder is one of the most popular optional KitchenAid attachments. It connects to the front of the mixer housing rather than the bottom hub. To remove it, unscrew the locking ring at the back of the grinder housing. Then carefully pull the grinder body away from the mixer.
Be careful with the blade assembly inside. The grinder blade is very sharp. Always handle it by the handle or with a kitchen towel to avoid cuts.
Slicing and Shredding Discs
The slicing disc and shredding disc attach to the food grinder hub on the front of the mixer. To remove them, first remove the food grinder as described above. Then remove the disc from the grinder’s feed tube by pulling it straight out.
These discs have very sharp edges. Always handle them carefully and store them in their protective case. Never leave them loose in a drawer where they can chip or dull against other utensils.
Quick Tips for Safe and Easy Removal
Here are some practical tips that make attachment removal even smoother every time:
- Apply a thin layer of food-safe silicone spray to the hub threads if attachments feel stuck. This prevents food buildup from locking the connection.
- Use a damp cloth for grip if the attachment is slippery or greasy. This gives you better control during removal.
- Remove attachments immediately after use before food dries and hardens around the hub.
- Keep the release lever lubricated with a drop of food-grade machine oil if it feels stiff.
- Never remove attachments with wet hands if the mixer is still plugged in. Always dry your hands first.
- Use the attachment storage box that comes with most KitchenAid mixers. It keeps everything organized and protected.
Expert Insight
Professional bakers recommend removing attachments within five minutes of finishing your mix. This prevents dough or batter from drying around the hub and locking the attachment in place. A quick rinse under warm water right after use makes the next removal effortless.
Common Mistakes to Avoid When Removing Attachments
Even experienced cooks make mistakes with attachment removal. Here are the most common errors and how to avoid them.
Mistake 1: Forcing a Stuck Attachment
This is the number one mistake people make. When an attachment will not budge, the instinct is to pull harder. This can strip the hub gears, bend the attachment shaft, or crack the mixer housing. Instead, stop and figure out why it is stuck. Usually, it is dried food debris or a missed release lever step.
Mistake 2: Removing Attachments While the Mixer Is On
Never attempt to remove an attachment while the mixer is running or even in standby mode. The spinning shaft can catch your fingers or pull the attachment off violently. Always power off and unplug first.
Mistake 3: Using Improvised Tools
Some people reach for pliers, butter knives, or other tools to pry off stuck attachments. This almost always causes damage. The attachment and hub are designed to be removed by hand. If they need tools, something is wrong and needs investigation, not force.
Mistake 4: Ignoring the Release Lever
Many users simply pull attachments straight off without engaging the release lever. On modern mixers, this puts unnecessary stress on the hub mechanism and can wear out the release over time. Always use the lever as intended.
Mistake 5: Storing Attachments Wet
Putting wet attachments back into storage leads to rust and corrosion, especially on the metal shafts and blades. Always dry attachments thoroughly before putting them away.
Cleaning and Maintaining Your Attachments
Proper cleaning goes hand in hand with safe removal. When you clean your mixer attachments correctly, they last longer and perform better. Here is how to care for each type.
Dishwasher Safe vs. Hand Wash Only
The flat beater, dough hook, and whisk attachment are generally dishwasher safe. Place them on the top rack to avoid contact with heating elements. However, hand washing is always gentler and extends the life of the attachments.
Specialty attachments like the pasta roller and food grinder parts should be hand washed. The dishwasher can damage the precision surfaces and coatings on these pieces. Use warm soapy water, a soft brush, and a clean towel for drying.
Dealing with Dried Food Buildup
If food has dried and hardened around the attachment hub or on the attachment itself, soak it in warm soapy water for 15 to 20 minutes. This softens the residue and makes cleaning much easier. For stubborn buildup, use a soft-bristle brush or an old toothbrush. Never use steel wool or abrasive scrubbers.
Preventing Rust and Corrosion
KitchenAid attachments are made from high-quality stainless steel, but they can still develop rust spots over time, especially if stored damp. To prevent this, always dry attachments completely before storing them. You can also lightly rub a food-safe mineral oil on metal surfaces before putting them away.
Key Takeaway
Clean attachments right after use, dry them thoroughly, and store them in a dry place. This simple routine prevents most common damage and keeps your KitchenAid mixer accessories performing like new for decades.
When to Seek Professional Help
Most attachment removal issues resolve with the steps above. But sometimes, you may encounter a problem that needs professional attention. If the release lever is broken or stuck, do not force it. If the attachment hub feels loose or wobbly, the internal gears may be worn. If you notice metal shavings or unusual noises during removal, stop using the mixer and contact a certified KitchenAid service center.
Attempting to repair the hub mechanism yourself can void your warranty and cause further damage. Professional technicians have the right tools and expertise to diagnose and fix issues safely.
Conclusion
Learning how to remove Kitchen Aid attachments without damage is easier than most people think. The key is patience, the right technique, and a little bit of regular maintenance. Always power off and unplug your mixer first. Use the release lever on modern models. Remove attachments gently by gripping the body, not the shaft. Clean and dry everything thoroughly after each use.
By following the steps in this guide, you protect your KitchenAid stand mixer, extend the life of your attachments, and keep your kitchen running smoothly. Whether you are swapping from a flat beater to a dough hook, or switching to a pasta roller attachment, the process is the same: be gentle, be methodical, and be safe.
Take a few minutes today to check your attachments, clean the hub, and practice the removal process. Your mixer will thank you with years of reliable performance. Happy mixing!
Frequently Asked Questions
Can I use a towel to remove a stuck KitchenAid attachment?
Yes, wrapping a dry towel around the attachment body gives you a better grip and prevents slipping. This is a safe and effective method for attachments that feel slippery from grease or dough residue. Just make sure the mixer is unplugged before you try.
Why does my KitchenAid attachment get stuck after mixing dough?
Dough residue dries and hardens around the attachment hub, locking the piece in place. This is very common with bread dough. To prevent it, rinse the attachment under warm water immediately after use. A quick soak in warm soapy water usually frees a stuck attachment within minutes.
Are all KitchenAid mixer attachments removable the same way?
Most standard attachments like the flat beater, dough hook, and whisk use the same release lever method. However, specialty attachments such as the food grinder, pasta roller, and slicing disc connect through different hubs and may require additional steps. Always check the user manual for your specific attachment.
How often should I clean my KitchenAid mixer attachments?
You should clean every attachment after each use. This prevents food buildup, staining, and odors. A quick rinse right after mixing takes only a few seconds and saves you from scrubbing dried-on residue later. For best results, wash with warm soapy water and dry thoroughly before storing.
Is it safe to put KitchenAid attachments in the dishwasher?
The flat beater, dough hook, and whisk attachment are generally dishwasher safe on the top rack. However, specialty attachments like the pasta roller and food grinder parts should be hand washed. The high heat and harsh detergents in dishwashers can damage coatings and precision surfaces over time.
What should I do if the release lever on my KitchenAid mixer breaks?
If the release lever breaks or stops working, do not attempt to force attachments off. Contact a certified KitchenAid service center or authorized repair technician. Forcing removal without a working lever can damage the hub gears and void your warranty. KitchenAid offers replacement parts and repair services for most models.