
Knowing how to take off a lawn mower blade is a simple skill every homeowner should have. This guide walks you through each step safely, from disconnecting the spark plug to removing the blade bolt. You will learn how to remove, clean, sharpen, and replace your lawn mower blade like a pro.
Have you ever stood in your yard, staring at your mower, wondering how to take off a lawn mower blade? Maybe the blade is dull, bent, or clogged with old grass. Whatever the reason, removing a lawn mower blade is easier than most people think. You do not need to be a mechanic. You just need the right steps, a few basic tools, and a strong focus on safety.
This guide will show you exactly how to remove a lawn mower blade without any hassle. We will cover every step in plain language. You will learn why safety matters most, what tools you need, and how to put everything back together correctly. By the end, you will feel confident handling your own lawn mower blade removal at home.
Taking care of your lawn mower blade is a big part of regular lawn mower maintenance. A clean, sharp blade gives you a healthier lawn. It also saves you time and money. So let us dive right in and walk through the entire process together.
Key Takeaways
- Safety First: Always disconnect the spark plug before touching the lawn mower blade to prevent accidental starts.
- Right Tools Matter: Using the correct blade removal tool and socket size makes the job fast and easy.
- Mark the Blade: Mark the bottom side of the blade before removal so you reinstall it in the correct position.
- Clean and Sharpen: Removing the blade gives you a perfect chance to clean it and sharpen the edges for better cuts.
- Check the Blade Adapter: Inspect the blade adapter and flywheel key for damage every time you take off the lawn mower blade.
- Torque to Spec: Always tighten the blade bolt to the manufacturer’s recommended torque setting for safe operation.
- Replace When Needed: A damaged or bent lawn mower blade should be replaced, not re-sharpened, for safe and clean cuts.
📑 Table of Contents
- Why You Need to Remove Your Lawn Mower Blade
- Safety Precautions Before You Start
- Tools You Will Need
- Step-by-Step Guide to Remove the Lawn Mower Blade
- How to Inspect and Maintain the Blade
- Reinstalling the Lawn Mower Blade Correctly
- Common Mistakes to Avoid
- Expert Tips for Better Lawn Mower Blade Maintenance
- Frequently Asked Questions
- Final Thoughts
Why You Need to Remove Your Lawn Mower Blade
There are several good reasons to take off your lawn mower blade. Most homeowners do it for one of three main reasons. Understanding these reasons helps you know what to expect during the process.
Dull or Damaged Blades
Over time, your lawn mower blade gets dull. It may also chip or bend from hitting rocks, branches, or other hard objects. A dull blade tears the grass instead of cutting it cleanly. This leaves brown, ragged tips on your lawn. It also makes the grass more vulnerable to disease. Removing the blade lets you sharpen it or replace it with a new one.
Deep Cleaning
Grass clippings, mud, and debris build up on the blade and inside the mower deck. This buildup creates rust and slows down your mower. When you take off the lawn mower blade, you can scrub away all that gunk. A clean blade cuts better and lasts longer.
Blade Balance Check
An unbalanced lawn mower blade causes vibrations. These vibrations damage the mower engine and bearings over time. Removing the blade lets you check its balance. You can use a blade balancer or simply hang the blade on a nail to see if it sits level.
Safety Precautions Before You Start
Safety is the most important part of any lawn mower repair job. A spinning blade can cause serious injuries. Even a small mistake can lead to cuts, bruises, or worse. Follow every safety step below before you begin.
Disconnect the Spark Plug
This is the single most important step. The spark plug wire keeps the engine from starting accidentally. Find the spark plug wire and pull it off the spark plug. Tuck the wire away from the plug so it cannot touch by mistake. This one step prevents thousands of injuries every year.
Let the Engine Cool Down
A hot engine and a hot muffler can burn your hands. Wait at least 30 minutes after your last mowing session. Let everything cool down before you touch any part of the mower. This includes the engine block, the exhaust, and the blade itself.
Wear Safety Gear
Put on a pair of thick work gloves. The blade edges are razor sharp, even when they look dull. Safety glasses protect your eyes from any dirt or debris that falls during the process. Steel-toed boots are a good idea too, especially if you are working in a garage or workshop.
Secure the Mower
Turn the mower off its side or tip it carefully. Place a block of wood under the mower deck to keep it from rolling. Some people use a mower jack or a car jack with a sturdy base. Whatever method you choose, make sure the mower stays stable the entire time you work on it.
Tools You Will Need
Gathering your tools before you start saves a lot of frustration. You do not need anything fancy. Most of these items are things you already have at home.
- Socket wrench set — the right size socket for your blade bolt
- Blade removal tool — many mower brands sell a dedicated tool for this
- Pliers or wrench — to hold the blade adapter steady
- Rubber mallet — helps loosen a stuck blade
- Wire brush — for cleaning off grass and rust
- Torque wrench — to tighten the blade bolt to the correct setting
- Safety gloves and glasses — non-negotiable for protection
- Marker or paint pen — to mark the blade orientation
- Clean rag or shop towel — for wiping down the blade and deck
- New blade (if needed) — check your mower model number before buying
Not every tool on this list is required for every mower. Check your owner’s manual to confirm the correct socket size and bolt type. Using the wrong size can strip the bolt and make the job much harder.
Step-by-Step Guide to Remove the Lawn Mower Blade
Now that you have your safety gear on and your tools ready, let us walk through the actual removal process. Follow each step carefully and do not skip anything.
Step 1: Turn Off the Mower and Disconnect the Spark Plug
If the mower was recently running, turn the key to off and let it sit. Then find the spark plug wire and pull it straight off the spark plug. Move the wire to the side where it cannot touch the plug. This is your first line of defense against accidental engine starts.
Step 2: Tip the Mower on Its Side
Carefully turn the mower onto its side. The air filter should face up so oil does not leak into it. Place a block of wood or a sturdy object under the mower deck to prevent it from rolling. If your mower has a fuel valve, turn it off before tipping to reduce the chance of leaks.
Step 3: Mark the Blade Orientation
Use a marker or paint pen to draw an arrow on the top of the blade. This arrow should point toward the engine when the mower is right-side up. Marking the blade saves you from guessing during reinstallation. A blade put on backwards will not cut properly and can damage your lawn.
Step 4: Hold the Blade in Place
The blade spins freely, so you need to keep it from turning. Use a blade removal tool or a piece of wood to wedge between the blade and the mower deck. Some people use a clamp. The key is to keep the blade completely still while you loosen the bolt.
Step 5: Loosen the Blade Bolt
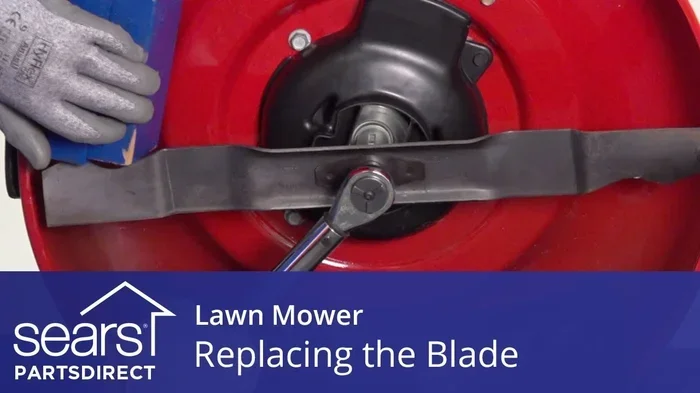
Find the center bolt that holds the blade to the blade adapter on the engine crankshaft. Place the correct socket on your wrench. Most blade bolts are reverse-threaded, which means you turn them clockwise to loosen. This is different from most bolts, so be careful. If the bolt is stuck, spray a little penetrating oil on it and wait a few minutes before trying again.
Step 6: Remove the Blade and Adapter
Once the bolt is loose, pull it out completely. The blade will lift off the adapter. Set the bolt and any washers aside in a safe place. You may need to tap the blade gently with a rubber mallet if it is stuck. Never use a metal hammer directly on the blade. Inspect the blade adapter for any cracks or wear while you have it off.
Step 7: Clean the Blade Adapter and Mower Deck
With the blade removed, this is the perfect time to clean everything. Use a wire brush to scrape off caked-on grass and dirt from the blade adapter and the underside of the mower deck. A clean deck allows better airflow and gives you a cleaner cut. You can also spray the inside of the deck with a hose, but make sure the engine and air filter stay dry.
How to Inspect and Maintain the Blade
With the lawn mower blade off, you have a great opportunity to inspect it closely. Here is what to look for and how to handle each situation.
Check for Damage
Run your fingers carefully along the cutting edge. Feel for any nicks, chips, or bends. Hold the blade up to a light and look through it. If you see any cracks, the blade must be replaced. A cracked blade can fly apart during operation and cause serious damage or injury.
Sharpen the Blade
A sharp blade cuts clean and heals the grass quickly. You can sharpen the blade with a bench grinder, a file, or a rotary tool. Hold the tool at the same angle as the existing edge. Work on one side first, then flip the blade and match the angle on the other side. Do not remove too much metal. The goal is to restore the original edge, not reshape the blade.
Balance the Blade
An unbalanced blade causes the mower to vibrate excessively. This vibration wears out bearings and damages the engine crankshaft. To check balance, find the center hole of the blade and hang it on a nail or blade balancer. If one side dips down, that side is heavier. Remove a small amount of metal from the heavy side using a file or grinder. Keep checking until the blade sits level.
Know When to Replace Instead of Sharpen
Sometimes sharpening is not enough. If the blade is badly bent, has large chunks missing, or shows signs of metal fatigue, replace it. A new blade is not expensive, and it performs far better than a damaged one. Always match the replacement blade to your specific mower model. Check the owner’s manual or the mower deck label for the correct part number.
Reinstalling the Lawn Mower Blade Correctly
Putting the blade back on is just as important as taking it off. A poorly installed blade is dangerous and will not cut well. Follow these steps carefully.
- Clean the blade adapter — remove any old grass or rust from the adapter surface.
- Place the blade on the adapter — align the blade with the adapter and insert the center bolt.
- Use the correct washers — most mowers use a specific washer setup. The cup-shaped washer usually goes on the blade side, not the engine side.
- Tighten the bolt — hold the blade steady with your blade removal tool or a block of wood. Tighten the bolt firmly. Use a torque wrench if possible to avoid over-tightening or under-tightening.
- Reconnect the spark plug wire — push the wire firmly onto the spark plug until it clicks into place.
- Right the mower — carefully turn the mower back over and remove any blocks or supports.
- Test the blade — start the mower and let it run for a minute. Listen for any unusual vibrations or sounds. A smooth, quiet run means the blade is installed correctly.
Always double-check that the blade spins freely and does not touch the mower deck. A blade that rubs against the deck will dull quickly and could damage the deck itself.
Common Mistakes to Avoid
Even experienced homeowners make mistakes when removing a lawn mower blade. Here are the most common errors and how to avoid them.
- Forgetting to disconnect the spark plug — This is the number one mistake. Always pull the wire off before you touch the blade.
- Using the wrong socket size — A loose socket can strip the bolt head. Check the bolt size before you start.
- Ignoring reverse threads — Most blade bolts tighten counterclockwise and loosen clockwise. Read your manual to confirm.
- Not marking the blade — Putting the blade back on upside down ruins your lawn cut and stresses the engine.
- Over-tightening the bolt — Too much force can warp the blade adapter or crack the crankshaft.
- Skipping the balance check — An unbalanced blade causes long-term damage to the mower engine and bearings.
- Reusing a worn blade adapter — The adapter wears out over time. Replace it if you notice any cracks or deformation.
Expert Tips for Better Lawn Mower Blade Maintenance
Small habits make a big difference in how long your blade lasts and how well your mower performs. Here are some expert-backed tips you can start using today.
Sharpen your blade at least twice per season. For a typical home lawn, this means once in the spring and once in mid-summer. If you mow frequently or your lawn has lots of debris, you may need to sharpen more often.
Clean the blade after every few mows. A quick wipe-down with a rag prevents buildup and keeps the blade light and balanced. This takes less than two minutes and adds weeks to the blade’s lifespan.
Check the blade height setting regularly. Cutting your grass too short stresses the blade and the engine. Most grass types do best when kept at two to three inches tall. Longer grass also shades out weeds naturally.
Store the mower properly during the off-season. A clean, dry mower with a sharp blade starts up easily in spring. Consider applying a light coat of oil to the blade to prevent rust during storage.
Keep spare blades on hand. A new blade is inexpensive and ensures you always have a sharp cutting edge ready. Many homeowners keep two or three blades rotated through the season for the best results.
Frequently Asked Questions
Do I need a special tool to remove a lawn mower blade?
A dedicated blade removal tool makes the job easier, but it is not required. A socket wrench that fits the blade bolt works just as well. Some people use a piece of wood and a hammer to hold the blade steady. The key is to keep the blade from spinning while you loosen the center bolt.
Which way do I turn the blade bolt to loosen it?
Most lawn mower blade bolts are reverse-threaded. This means you turn them clockwise to loosen and counterclockwise to tighten. However, some models use standard threads. Always check your owner’s manual before you start turning. Using the wrong direction can damage the bolt or the engine crankshaft.
How often should I replace my lawn mower blade?
A well-maintained blade can last for several seasons if you sharpen it regularly. However, you should replace the blade if you notice cracks, large chips, or significant bending. Most homeowners replace their blade every two to three years depending on how often they mow and what conditions they cut through.
Can I remove the lawn mower blade with the engine still warm?
You can, but you should let the engine cool down first. A hot blade can burn your hands, and a hot engine increases the risk of accidental contact with moving parts. Waiting 30 minutes after your last mowing session is a safe and smart practice.
Is it necessary to balance the lawn mower blade after sharpening?
Yes, balancing the blade is very important. An unbalanced blade causes excessive vibrations that damage the mower engine, bearings, and cutting deck over time. You can use a blade balancer tool or simply hang the blade on a nail to check if it stays level. Remove small amounts of metal from the heavy side until the blade balances evenly.
What size socket do I need for the blade bolt?
The socket size varies by mower brand and model. Common sizes include 1/2 inch, 9/16 inch, and 15/16 inch. Check your owner’s manual or look at the blade bolt directly to find the correct size. Using the wrong socket can round off the bolt head and make removal much harder.
Final Thoughts
Learning how to take off a lawn mower blade is one of the most useful skills you can develop as a homeowner. It saves you money on professional repairs. It keeps your mower running at peak performance. And it gives you a cleaner, healthier lawn every time you cut the grass.
Remember to always put safety first. Disconnect the spark plug, let the engine cool, and wear your gloves and glasses. Use the right tools and take your time with each step. Do not rush the process, especially when loosening the blade bolt or reinstalling the blade.
A well-maintained lawn mower blade makes all the difference. Your grass will look better, your mower will run smoother, and you will avoid costly repairs down the road. So grab your tools, follow the steps in this guide, and take on the job with confidence. Your lawn will thank you for it.